STEMulating Transitions is coming to the Martin-Pitt Partnership for Children this summer! Workshop will be held at ChildLinks in Greenville, NC. More details to come!
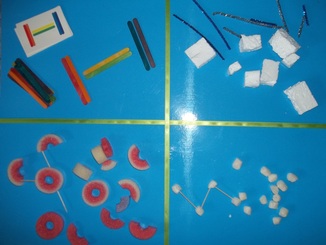 For many of my Engineering busy bags, I make cards to copy. This is NOT to discourage creativity, but rather to illustrate what can be done to my students. Once students understand spans and leverage and the like (or at least see that it is possible), then they can be even more creative with their own designs, whether it be with the activities, or building in centers. Visual Discrimination: This is just a simple set of cards that display different formations of colored popsicle sticks for students to recreate. The cards can be found here, the colored popsicle sticks can be found at the Dollar Tree. Ice Castle: I cut up several styrofoam packing pieces from Christmas packaging into small "bricks". Add some blue and white metallic pips cleaners and some toothpicks, and you have all you need to build your own ice castle! Pool Noodle Building Set: Did I mention that these things are extremely versatile?? I cut up pool noodles into small sections, then halved and quartered some of them. Add toothpicks, and you have a create-your-own-whatever building set. Popular results are robots, aliens, faces, and whatchamacallits. Constellation Maker: The cards are not pictured (due to being temporarily misplaced). But what we have here are packing peanuts (cut into squoundish bits) and toothpicks. There are cards that feature different constellations that students can recreate. Or they can make their own! (But they have to name them) 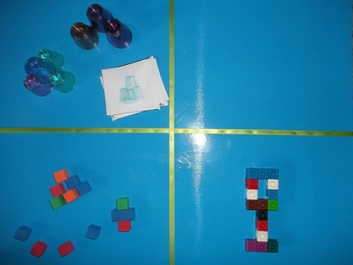 Cup Stacking:
Yes. We call them cups. That is all. These adorable, small cups can be found at the Dollar Tree in various colors. The picture cards can be found here. You can also add popsicle sticks to level it up. Block Building: Add picture cards to materials you already have in your classroom, such as wooden/foam cubes, snap cubes, or Lego's to illustrate spanning, leverage, and balance. You can add popsicle sticks to the blocks to level the activity up. Simply build different structures and take pictures of them that you can print out and place in the bag. 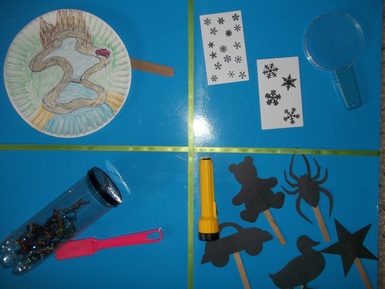 We all have many different science tools in our Science Center, but often what we are lacking is meaningful activities to use these tools with. I have pulled a few such tools and attempted to create something to do with them that illustrates their importance and usefulness. Magnet Racer: I actually saw this on a mommy blog, and HAD to make my own! Yes, it IS fun. And yes, I will let my students make some as well. I took a paper plate, drew a road on it (I was a little bored, so I added a beach and some mountains, etc, so the car would have something to crash into if I veered off course) and printed out a car picture from Google Images. I glued a button magnet on the car an on a popsicle stick (make sure they are the right polarity before gluing). You place the car on top of the plate, and use the popsicle stick on the bottom to "drive" the car around the track. Super. Fun. Magnifying Glass Snowflake Match: I printed out several Google Images of snowflake shapes, then made shrunken copies of them on the copier. Students look at the big flakes, then try to find the small ones using the magnifying glass to aid them. Magnet Discovery Bottle: This is just fun. I cut up several of the glittery metallic pipe cleaners and placed them in a tennis ball can. Using the magnet wand, students can observe them stacking up upon each other as they are drawn to the wand. Also. Super. Fun. Shadows: I die-cut several familiar shapes and glued them to popsicle sticks. Then I placed a flashlight in the bag with them, so that students can play with making shadows. 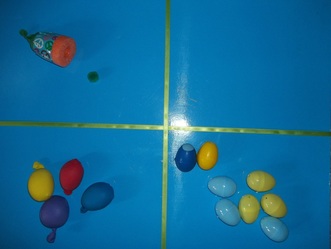 Pom-Pom Shooters: These illustrate force and propulsion. But basically they are fun! Directions for making them can be found here. Add some simple targets (on paper or 3D) and you can turn this activity into anything you like! Reinforce letters, numbers, etc with the targets. Five Senses Match Up:
Touch- Fill balloons with various objects of different textures (beans, pony beads, rice, etc- 2 of each) and have students match up the like textures. Be sure to put a second balloon over the first to reinforce it. (llthd) Sound- Like the balloons, but using plastic eggs. Fill them with items that make different sounds, and have students find the like eggs. To keep the eggs from popping open, cover them with a balloon. I did one set in one color, and the matches in another color, to help discern the matches. (It's harder than it looks!) Smell (not pictured)- Same principle of matching as the above two examples. I bought several plastic salt/pepper shakers from the Dollar Tree, along with s few different liquid potpourri scents. I put cotton balls in the shakers that were scented with the potpourri, and students can sniff through the shaker holes and find the matches. We discourage tasting of any and all toys on a regular basis. :) Alternatively, you can skip the matching part and simply have the students explore the different sounds, smells, etc and describe them (for expanding vocabulary). Math Busy bags can be found here and here.
They were previously featured in the Manipulative Makeover: DIY Edition workshop. STEMulating Transitions
Need more STEM time in your day? No budget for extra STEM materials? Let me share these easy to make, inexpensive STEM busy bag activities that are perfect for transition times. They add STEM learning time to your students' day, allow independent work on the carpet, and help you keep little minds active and engaged during transitions. Much like the Manipulatives Makeover: DIY Edition workshop, this one also features busy bag activities. But here, we focus more on STEM busy bags. This means adding activities that feature Science and Engineering, along with the Math bags we already had. In the following posts, I will show several of the 'busy bags' that I have made for my classroom. During transitions/wait time, students may choose an activity to do on their square. This gives them something new and interesting to keep their attention during these (sometimes hectic) transitions. I introduce the activities during centers/small group, offering to play them with a few kids that are interested. We do it together, so that when they have it on the carpet, they understand what to do. They can also show other students. I change the games whenever interest begins to wane. I only use one of each activity at a time, so that pieces do not get mixed up in the wrong bags. (Lesson learned the hard way!) At the beginning of the year, we had books in our carpet box. Those also get changed frequently. But when the books no longer hold their interest, we add the busy bags. We start by adding only a few (maybe 6 for 18 students), then increase it. Having only a few activities, and the remainder books, encourages our bathroom and sink lollygaggers to speed things along and get to the carpet! |
ArchivesCategories |
 RSS Feed
